
If you are running a 5-person company, hiring can be a real pain.
One minute you’re screening resumes, the next someone follows up on LinkedIn, and suddenly you’re wondering if you have missed out on a great hire.
When you’re short-staffed and each person is wearing multiple hats, things are bound to slip through the cracks.
But investing in an expensive ATS at such an early stage doesn’t make much sense because the volume isn’t high enough to justify the cost.
In cases like this, creating your own hiring pipeline is the best way to go.
You don’t need any expensive tools or complex systems to stay organized. With Notion and Google Workspace, you can build a solid pipeline to manage your hiring workflow.
In this article, I’ll show you how to run a hiring pipeline as a 5-person company without an ATS. The setup is beginner-friendly and doesn’t take much time.
What Is a Hiring Pipeline?
 To understand a hiring pipeline, there are certain things you should know about hiring first.
Recruitment isn’t a straightforward job.
It’s a multi-step process that involves identifying an open position, posting a job advertisement, screening applicants, and finally selecting the best person.
Managing it without a system is extremely challenging.
That’s why most recruiters use some kind of workflow to gain visibility into their hiring processes so they can confidently decide what to do next.
This workflow is basically called a hiring pipeline.
How Does It Work?
A hiring pipeline works like a funnel.
Each stage of the funnel represents a hiring stage, where the recruiter moves the candidates from one stage to another until they receive the job offer or get rejected.
The stages can vary depending on your workflow or the HR tool you use, but there are six stages that almost every hiring pipeline has;
1. Sourcing
Recruitment starts with sourcing.
When a recruiter receives the job requisition from the department, they start looking for a candidate with the right skills and experience for the job.
Some of the most notable sourcing channels include job ads, professional networks, recruitment platforms, and referrals.
2. Screening
Once applications are received, recruiters review them and forward the best-matching candidates to the hiring pipeline.
You can also add a sub-stage here for assessment tests and pre-screening phone calls.
3. Interview
In this stage, recruiters call shortlisted candidates for a round of online and offline interviews to evaluate them.
If the interview process is long, the recruiter may add sub-stages, like a first and second interview.
4. Selection
After the interviews, recruiters compare candidates using assessments and interviews to see who is the best fit for the role.
This is more of a back-end part of the job because all the work is already done. In the hiring pipeline, this stage simply represents the “in process” candidates.
5. Offer
The recruiter officially sends an offer letter to the candidate detailing the salary, benefits, and job responsibilities.
If you have a high volume, you add another stage after the “Offer” to track accepted/rejected offers and background checks.
6. Hired
This is the final stage of the hiring pipeline. Once the selected candidate officially becomes an employee, most recruiters close the open position.
Some, however, extend the pipeline to include onboarding, probation, and confirmation stages.
Why? Because around 1 in 8 employees typically quit during the probation period. Adding these stages saves you from repeating the hiring cycle.
Is a Hiring Pipeline Necessary? What Are The Main Benefits?
There are two major advantages to maintaining a proper hiring pipeline.
One, it organizes everything, reducing the chances of errors.
You don’t have to look through your notes to see if you have sent the interview details or an offer letter. Your hiring pipeline gives you the status update.
It makes the entire process faster and more efficient, ultimately improving your time-to-hire rate.
The second biggest benefit is the data analysis.
Each new hire brings insights into your hiring strategy, helping you identify areas that are likely causing bottlenecks.
For example, if you’re receiving a flood of applications but most candidates are getting rejected at the interview stage, that tells you the problem is inter-departmental.
You either didn’t receive the correct JD or your team didn’t interpret the department’s request well.
Similarly, if your hiring rate is good but employee turnover is high during the probation period, this indicates a poor onboarding process.
With a solid hiring pipeline, you can improve both your recruitment strategy and execution.
What Do You Need to Create a Hiring Pipeline?
Now that we have a general understanding of a hiring pipeline, let’s create a simple one from scratch.
To do that, you need to lay the groundwork first.
This involves planning your hiring process, outlining the job description, and setting up tools to organize and track candidates.
1. Plan Your Hiring Strategy
Start by setting up your sourcing channels.
There are multiple sourcing channels available to help you attract the right candidate, such as professional networks, social media, recruiting agencies, and referrals.
A good strategy is to diversify your sourcing channels to get the best hiring outcomes.
For example, job boards account for around 42% of hires, but referrals have a higher retention rate comparatively. If you utilize both channels effectively, you can improve your hiring ratio.
You should also build your company’s career page. It attracts only a small portion of applications, but those are usually high-intent leads.
2. Write A Clear Job Description
One of the biggest challenges of hiring is receiving too many unqualified applications.
Many recruiters attract the wrong pool of candidates because of a misleading JD and end up revising it, wasting time and effort.
The job description is the basis on which you run your entire hiring strategy.
If your JD is well-written and clear, you’ll likely find the qualified candidates right from the start.
To write a good JD, check out this article. The author has explained it in detail with real-life examples.
3. Invest In Tools
By this point, you should have a clear plan in mind on how to attract candidates.
The final step is to find the right tools and resources to build your hiring pipeline.
Generally, I would recommend investing in an ATS platform. It’s what every recruiter uses to organize information and automate repetitive workflows.
But our goal here is to find a budget-friendly option that doesn’t include an ATS.
I have picked Notion and Google Forms to create the hiring pipeline. I specifically chose them because they are easy to set up and offer free access.
If you are not familiar with Notion, it’s a project management platform. It provides a workspace to organize candidate information, track tasks, and collaborate with your team.
You can get started for free here. The signup will take a couple of minutes, and you can use your Gmail to create the account.
We have laid the groundwork. It’s time to build our hiring pipeline.
A Step-By-Step Guide To Build And Run A Hiring Pipeline
Below, I’ve created a step-by-step guide to build and run a hiring pipeline in Notion.
I’ve also explained how to use Google Forms and Sheets to collect applicants’ information.
Let’s start with Google Forms first. It’s quicker to set up and gives you a simple way to collect applications.
1. Create An Application Form
Google Workspace offers a free form builder that lets you create job applications with shareable links.
You can create the new form here.
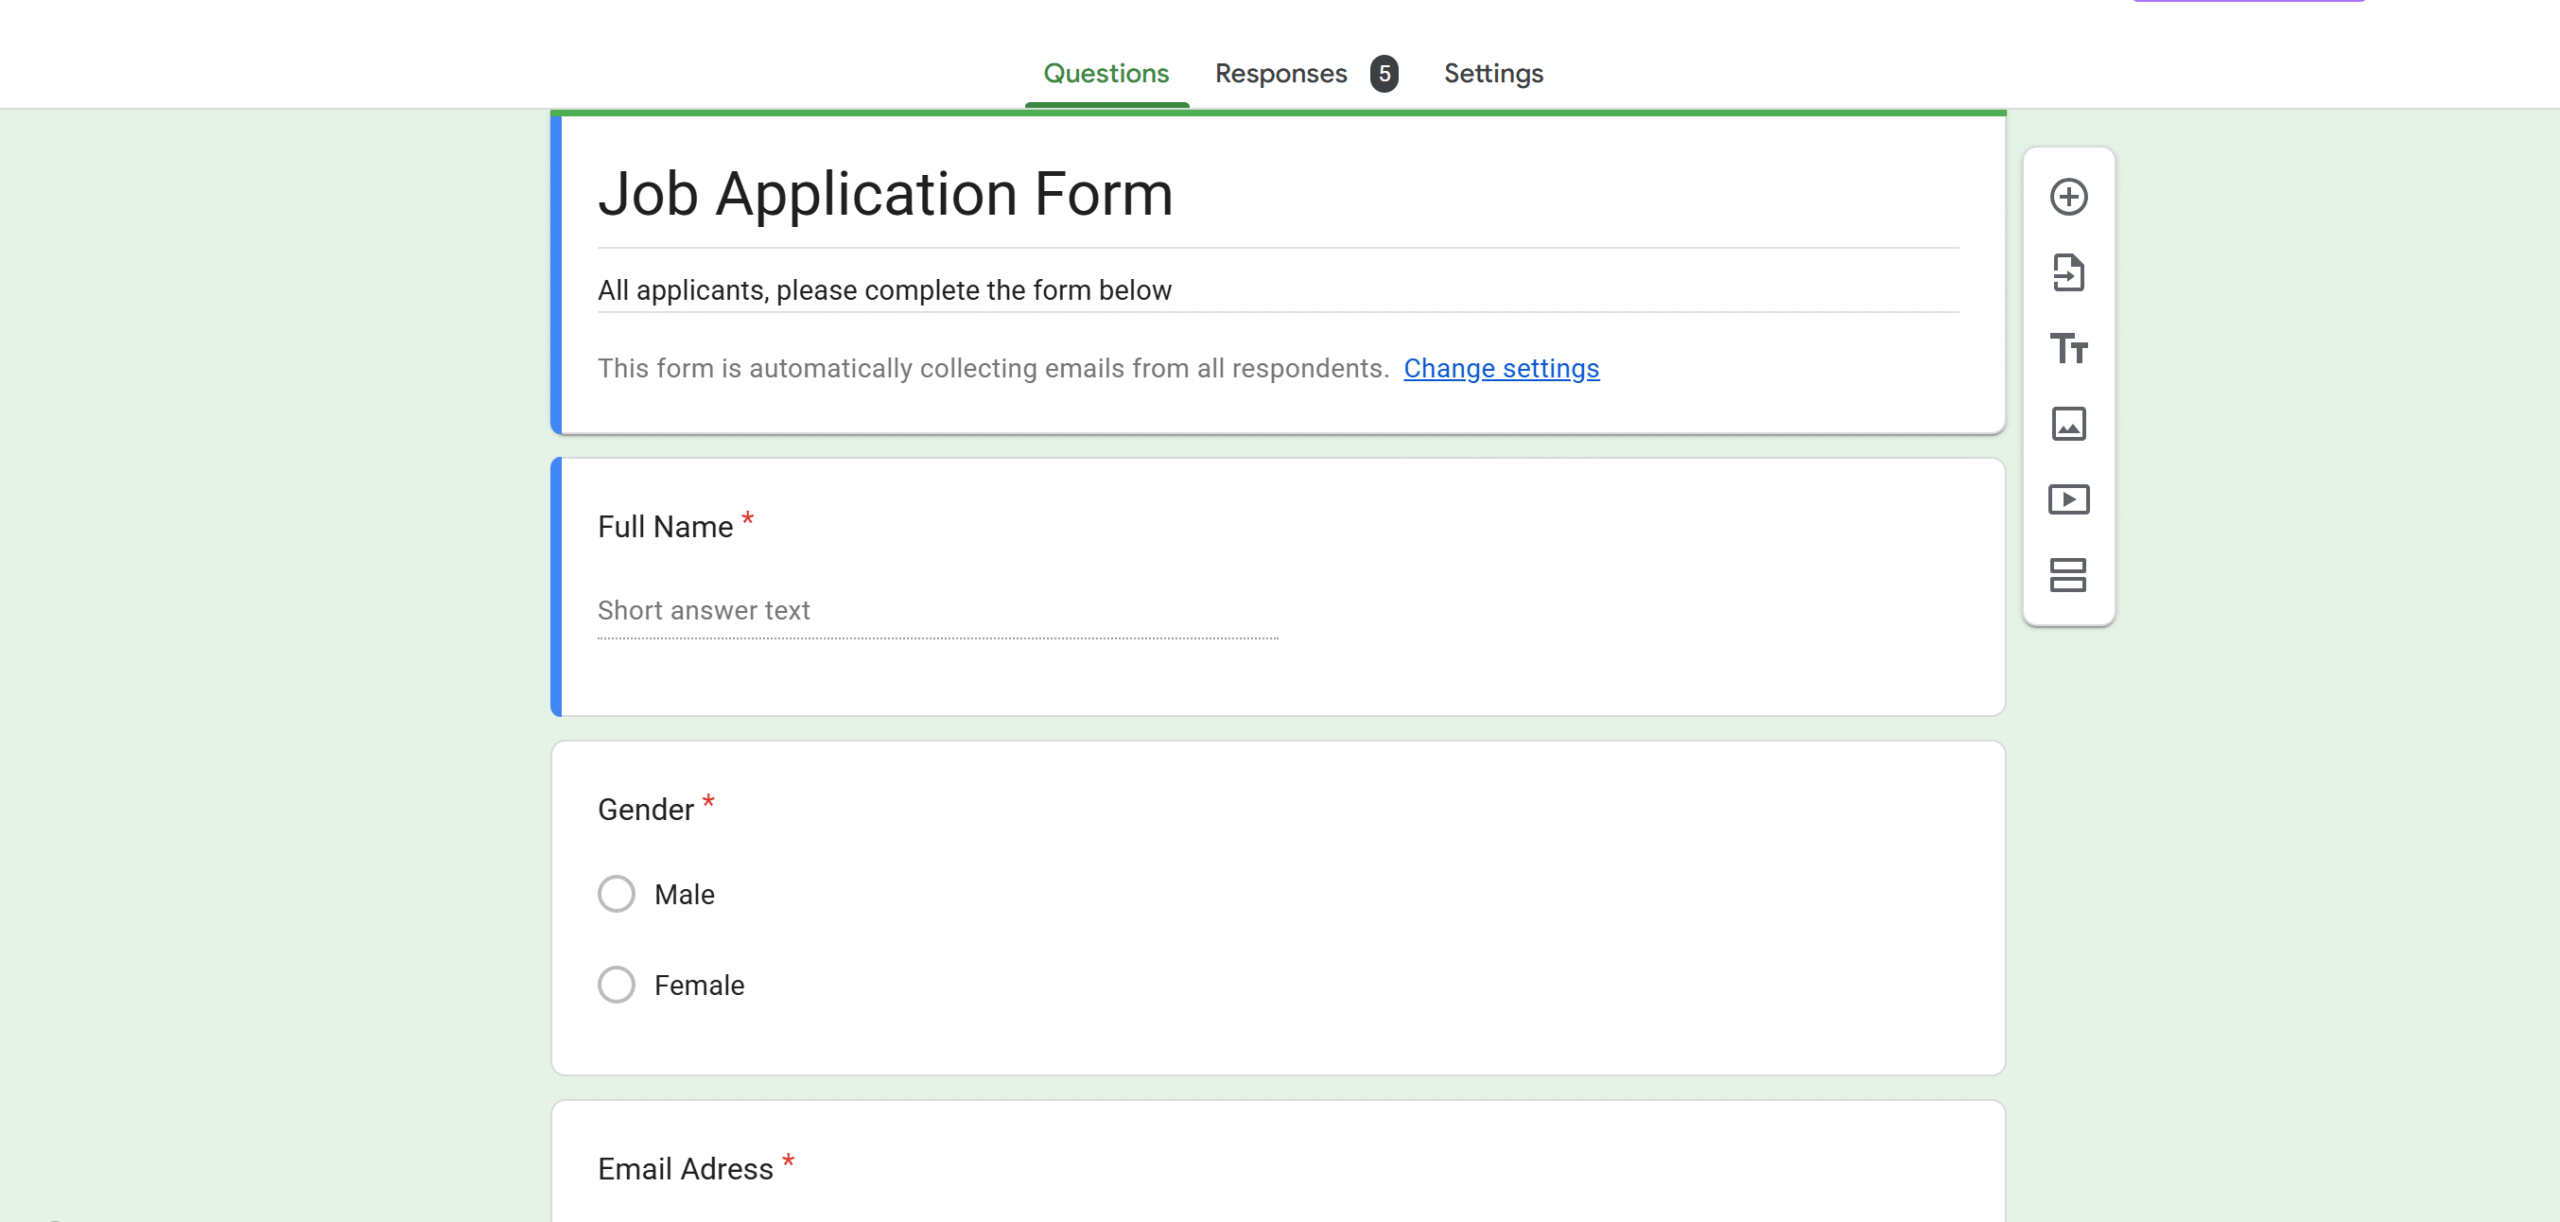
Click the blank form, add your title, and start adding fields. You can add checkboxes, multiple questions, a dropdown menu, or a simple blank line for answers.
You can structure the questions into sections and move the fields up and down.
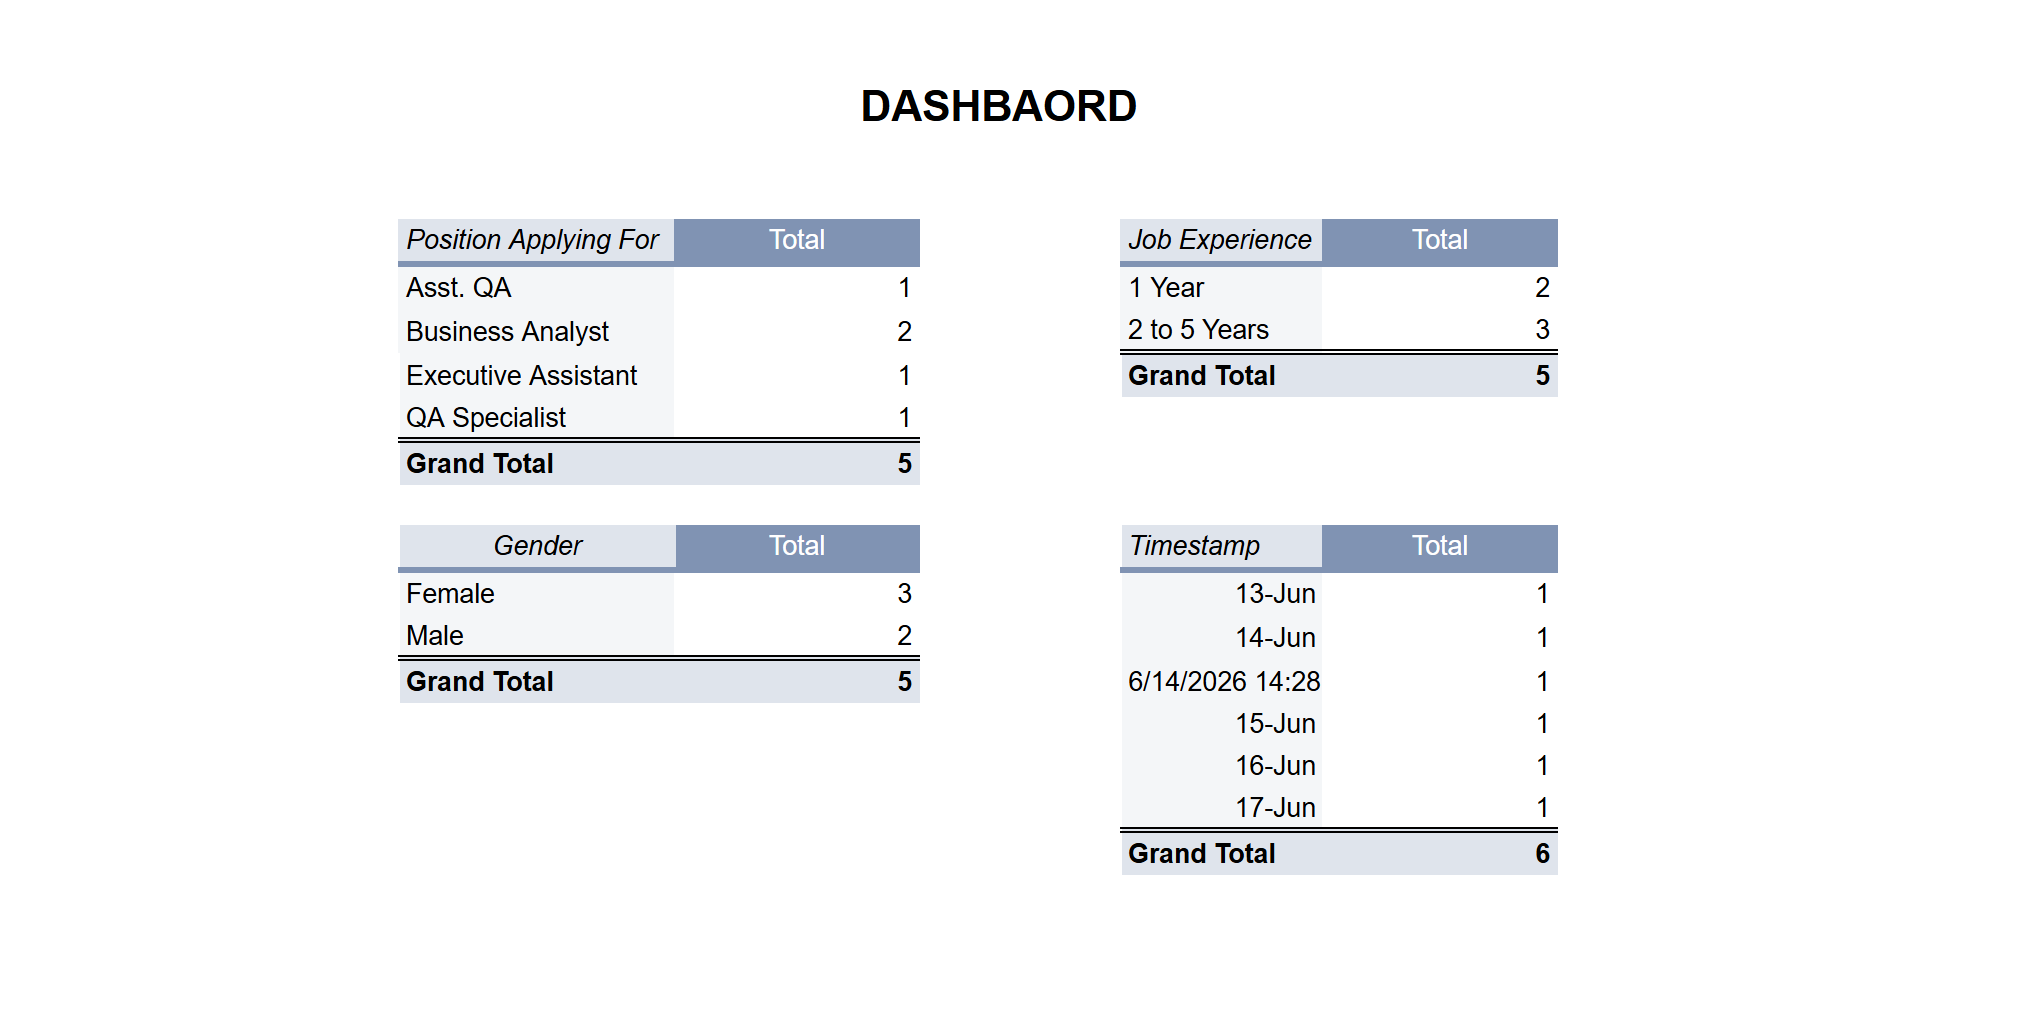
Google Forms also has built-in analytics in the “response” section. It tells you how many applied for a particular position, how many applicants were women and men, and the average job experience of your candidate pool.
It’s pretty basic, but you can create your own analytics section with Google Sheets as well. (Check the third step.)
This is the Google form I created for the job application. You can see the full form here.
2. Build Your Database
The next step is to create a place to store applicants’ responses.
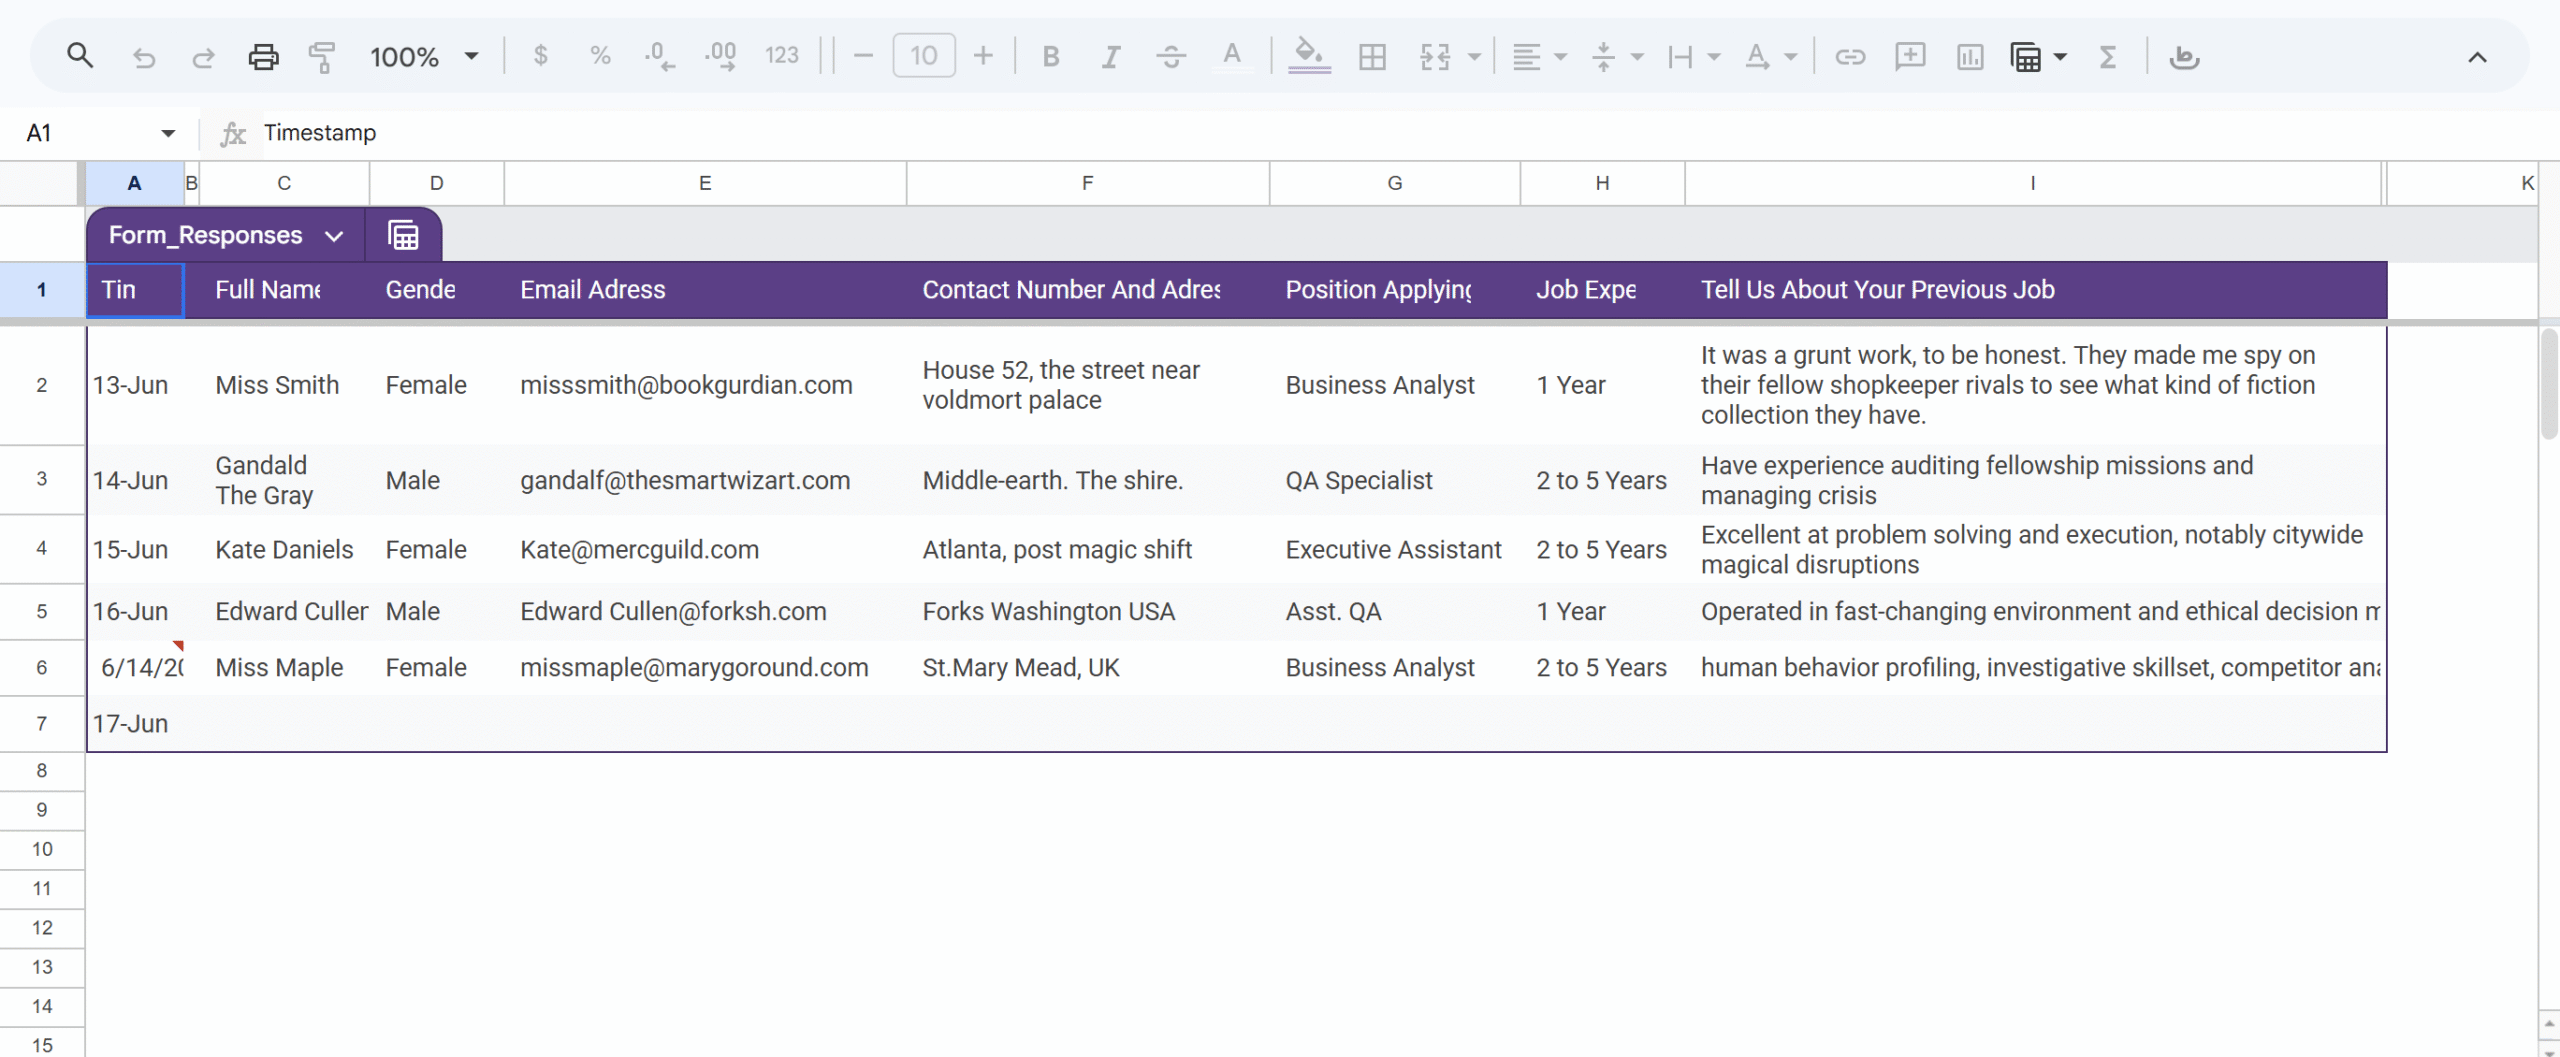
You can use Google Sheets to import answers automatically.
It integrates directly with Google Forms, and the data is organized in neat columns and rows, making it easy to sort data for the hiring pipeline.
Go to your form. Select the “response” section at the top of the Google form and click the “view in sheets” button.
A new sheet will appear, displaying all the responses.
I’ve created a few sample responses to populate the sheet. I’ve also cleaned up the sheet a little bit to improve its appearance.
3. Design A Dashboard For Reporting (Optional)
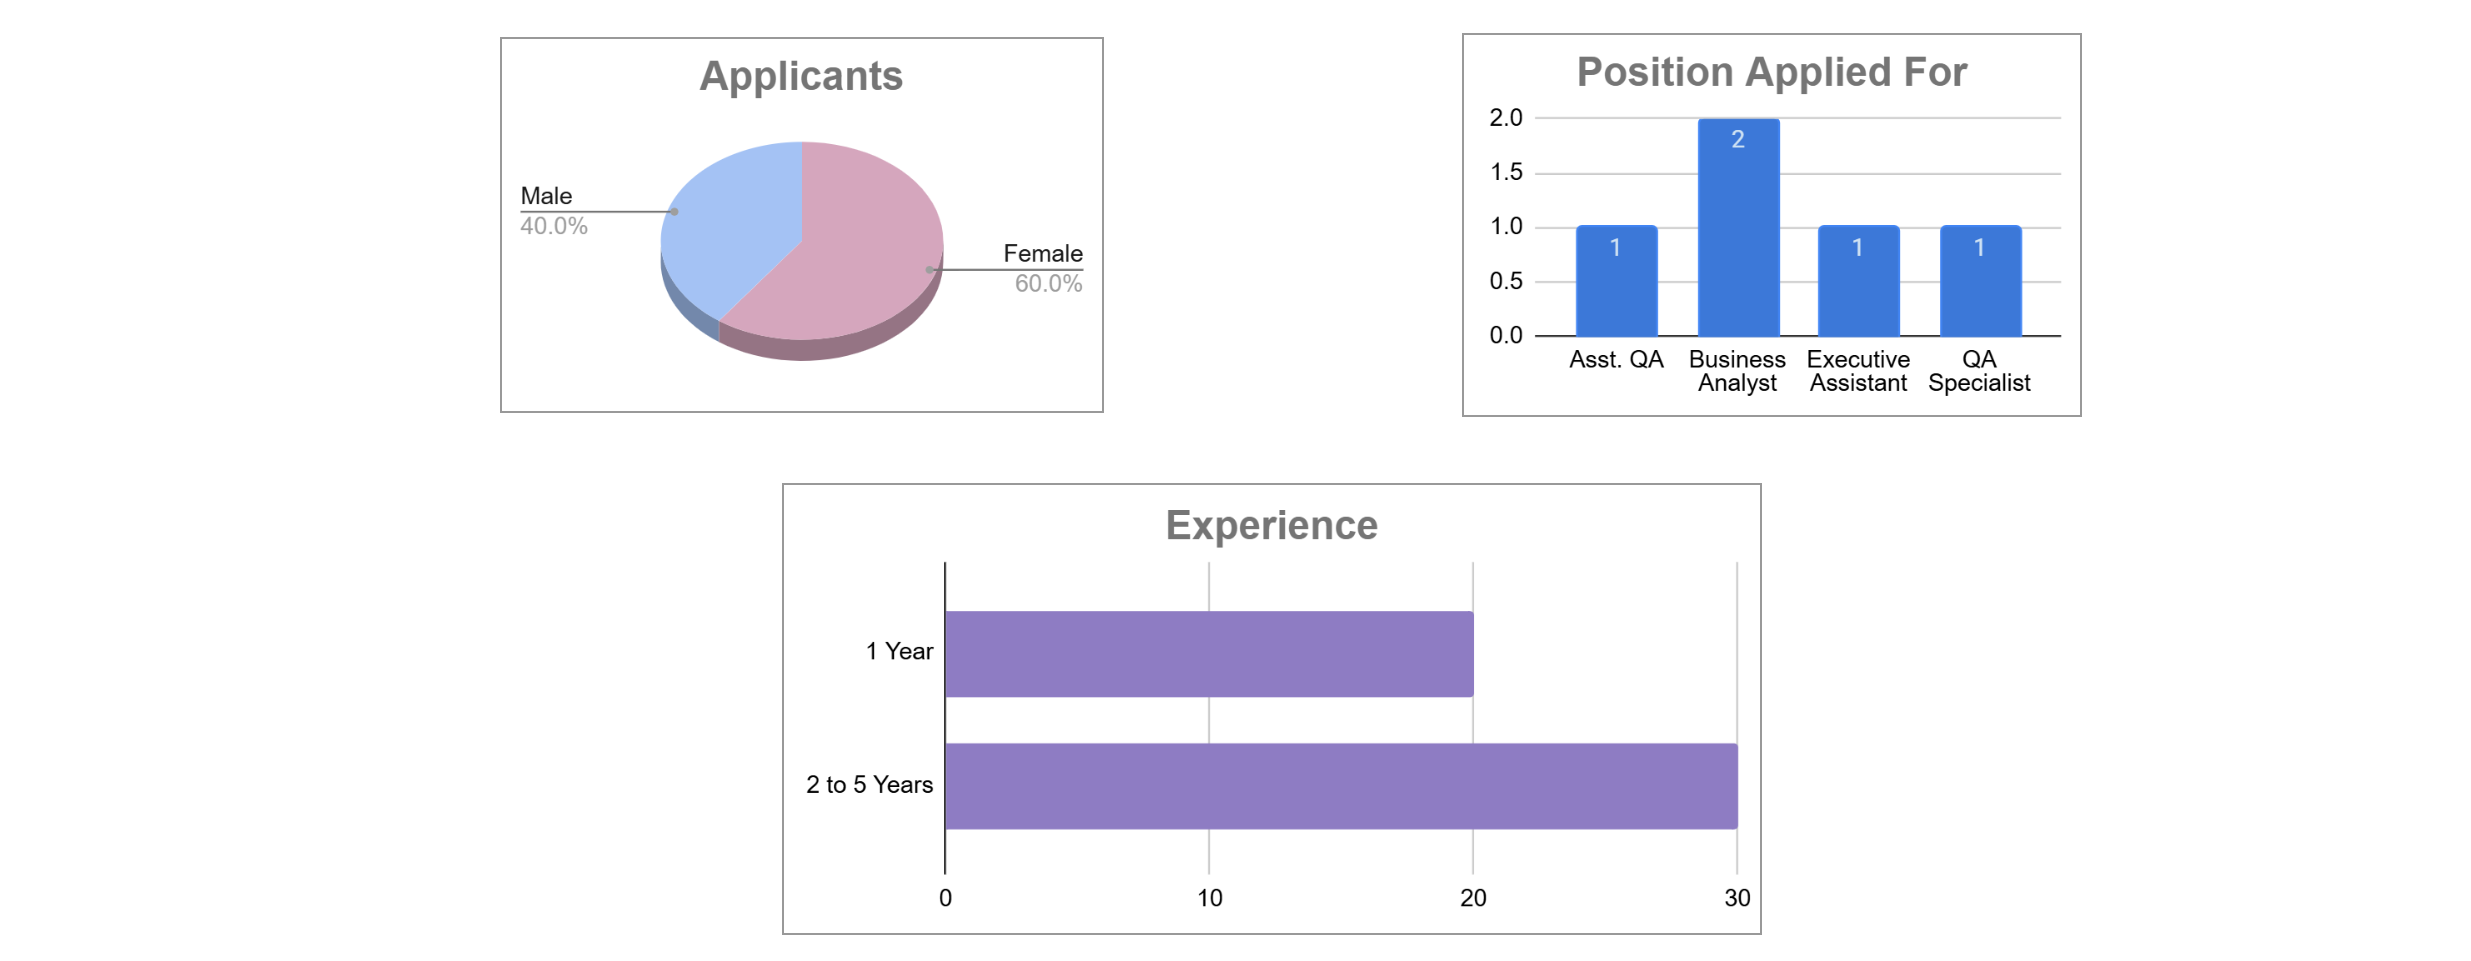
The third step isn’t particularly necessary for a hiring pipeline, but it can help you generate quick reports for management.
Many recruiters use pivot tables to create dashboards for monitoring and reporting. Since the sheets are connected, the data is automatically updated every time a new response is submitted.
I’ve created a simple dashboard just to show what you can do with Google Sheets’ built-in features. Use ChatGPT to get tutorials on how to create pivot tables.
4. Build Your Hiring Pipeline in Notion
If you haven’t signed up for Notion, you can do it here. The process is incredibly simple and doesn’t take much time.
Visit the official site and click the “Get Notion Free” button at the top right corner.
A new window will appear.
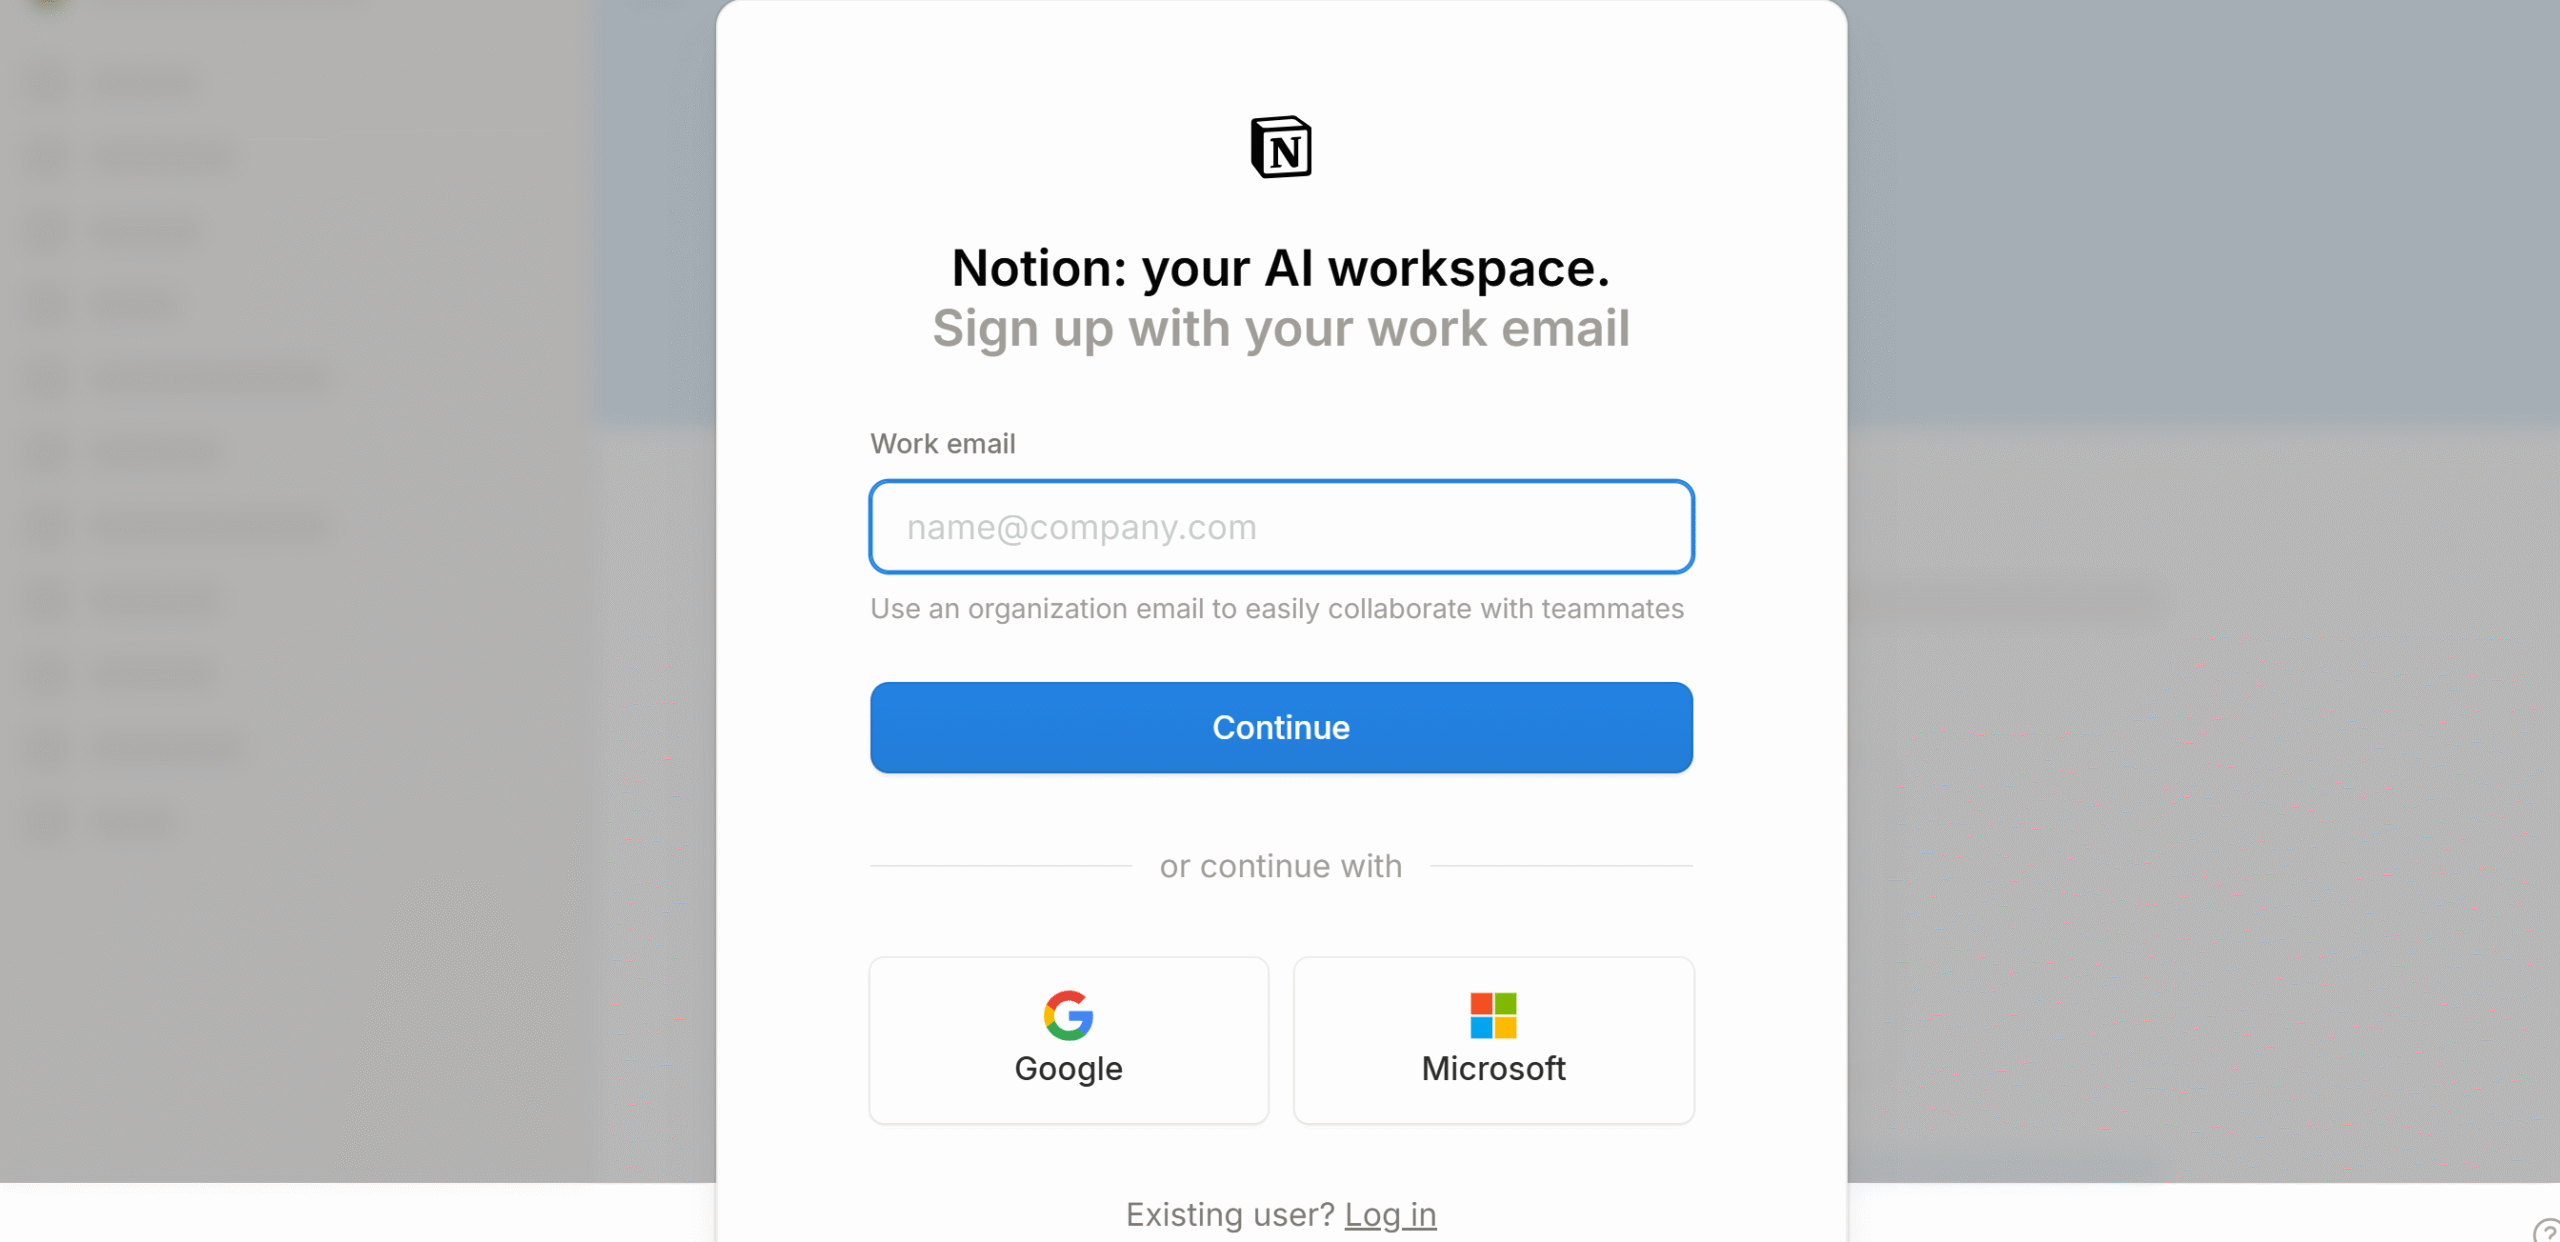
Choose your sign-up method and verify your account via the code. You’ll be directed to the profile page.
Create your profile and pick your workspace. Since you’re a 5-person team, choose the team workspace.
That’s it! You have successfully created your account.
(Just a heads-up: the personal account is forever free, but the Team account only offers a free trial. After it ends, you’d have to buy the subscription. I’ve used the personal account here for demonstration.)
Now let’s create a hiring pipeline in Notion.
Once you have access to your workspace, create a new page.
A blank space will appear in the middle of the screen.
Type /table in the paragraph and select the full table. Notion will show a small table inside the page.
This is your database.
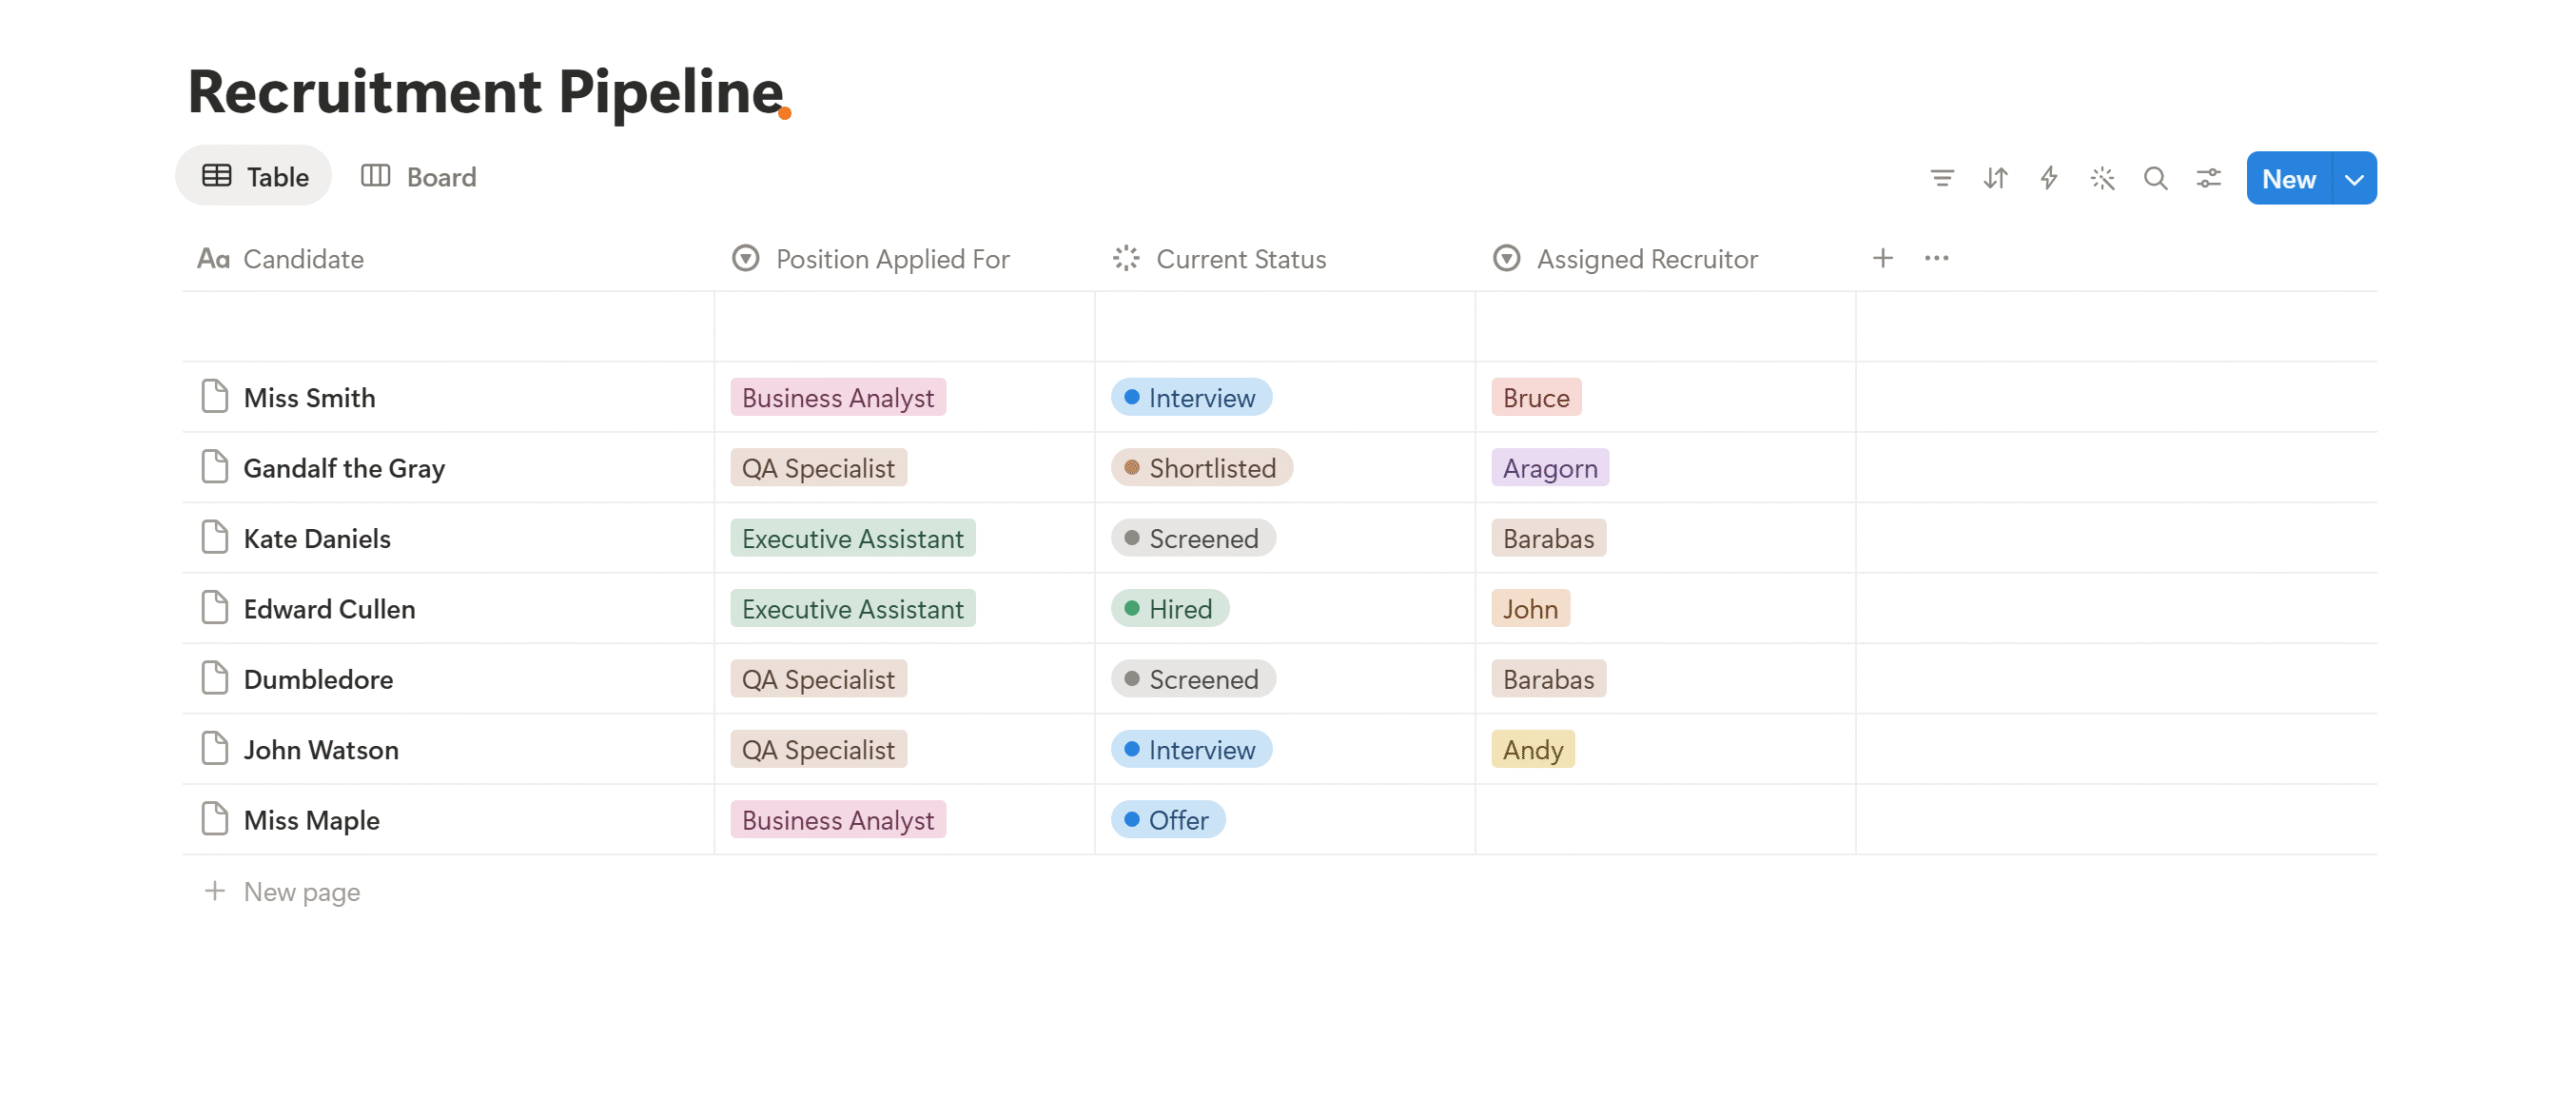
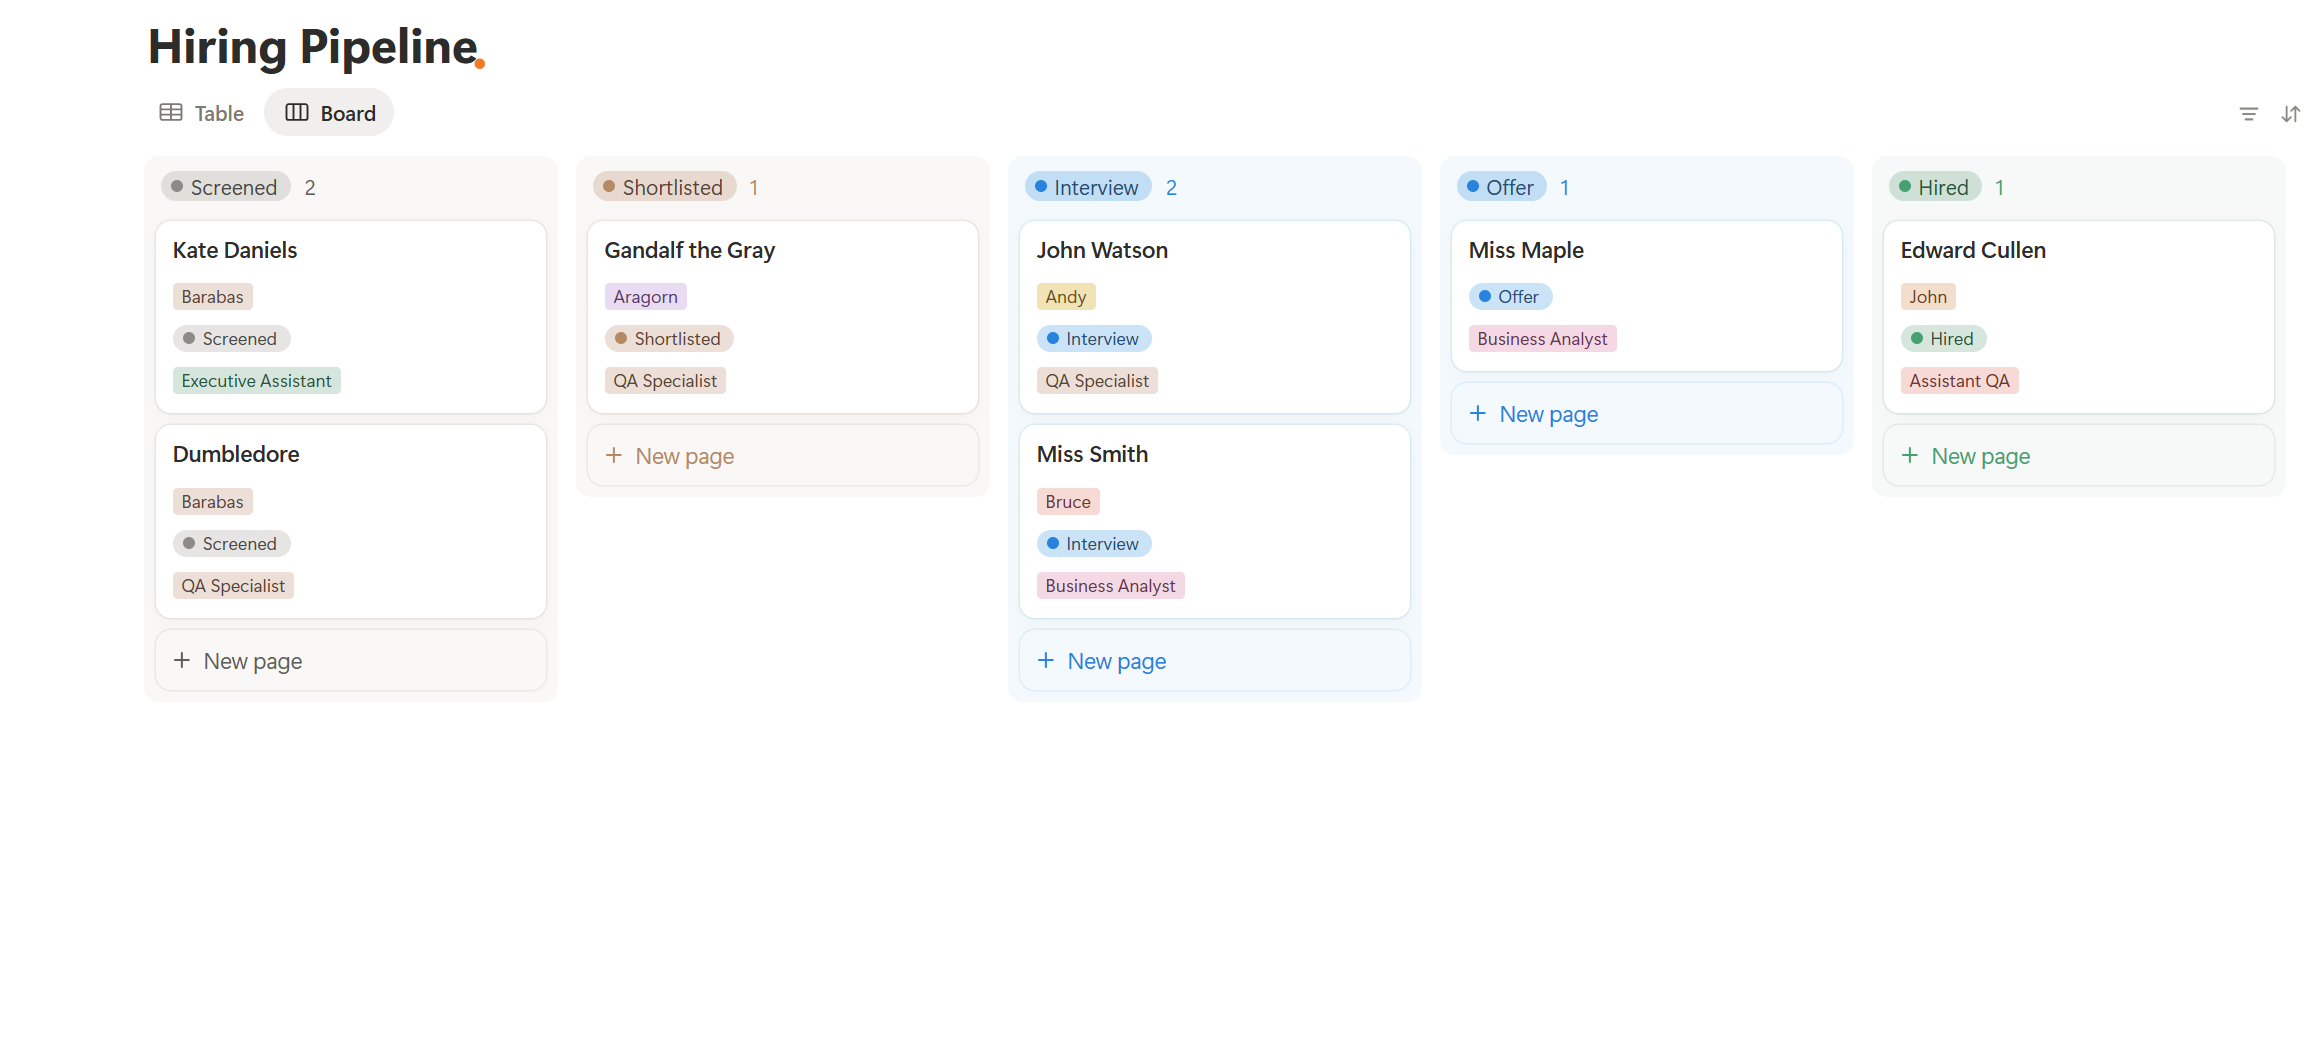
I’ve already customized the page, adding the title, renaming the fields, and manually filling the rows.
If you have a high volume, you can automate the process to save time. Notion allows you to integrate Google Sheets through Make or Zapier.
After your database is ready, convert it into a Kanban board.
Under the main title, you’ll find a “table” tag. It’s your current view. Click the “+” sign next to it and select “board” as a type.
Notion will automatically create a Kanban board view of the same table.
Go to the settings, select Group, and change it to Status. Create multiple properties under the group and name them screened, shortlisted, interview, offer, and hired.
Notion will automatically build columns under these names.
You can now easily track the candidates.
Under each column, you can create new pages to represent a candidate. They will appear as cards on the Kanban board.
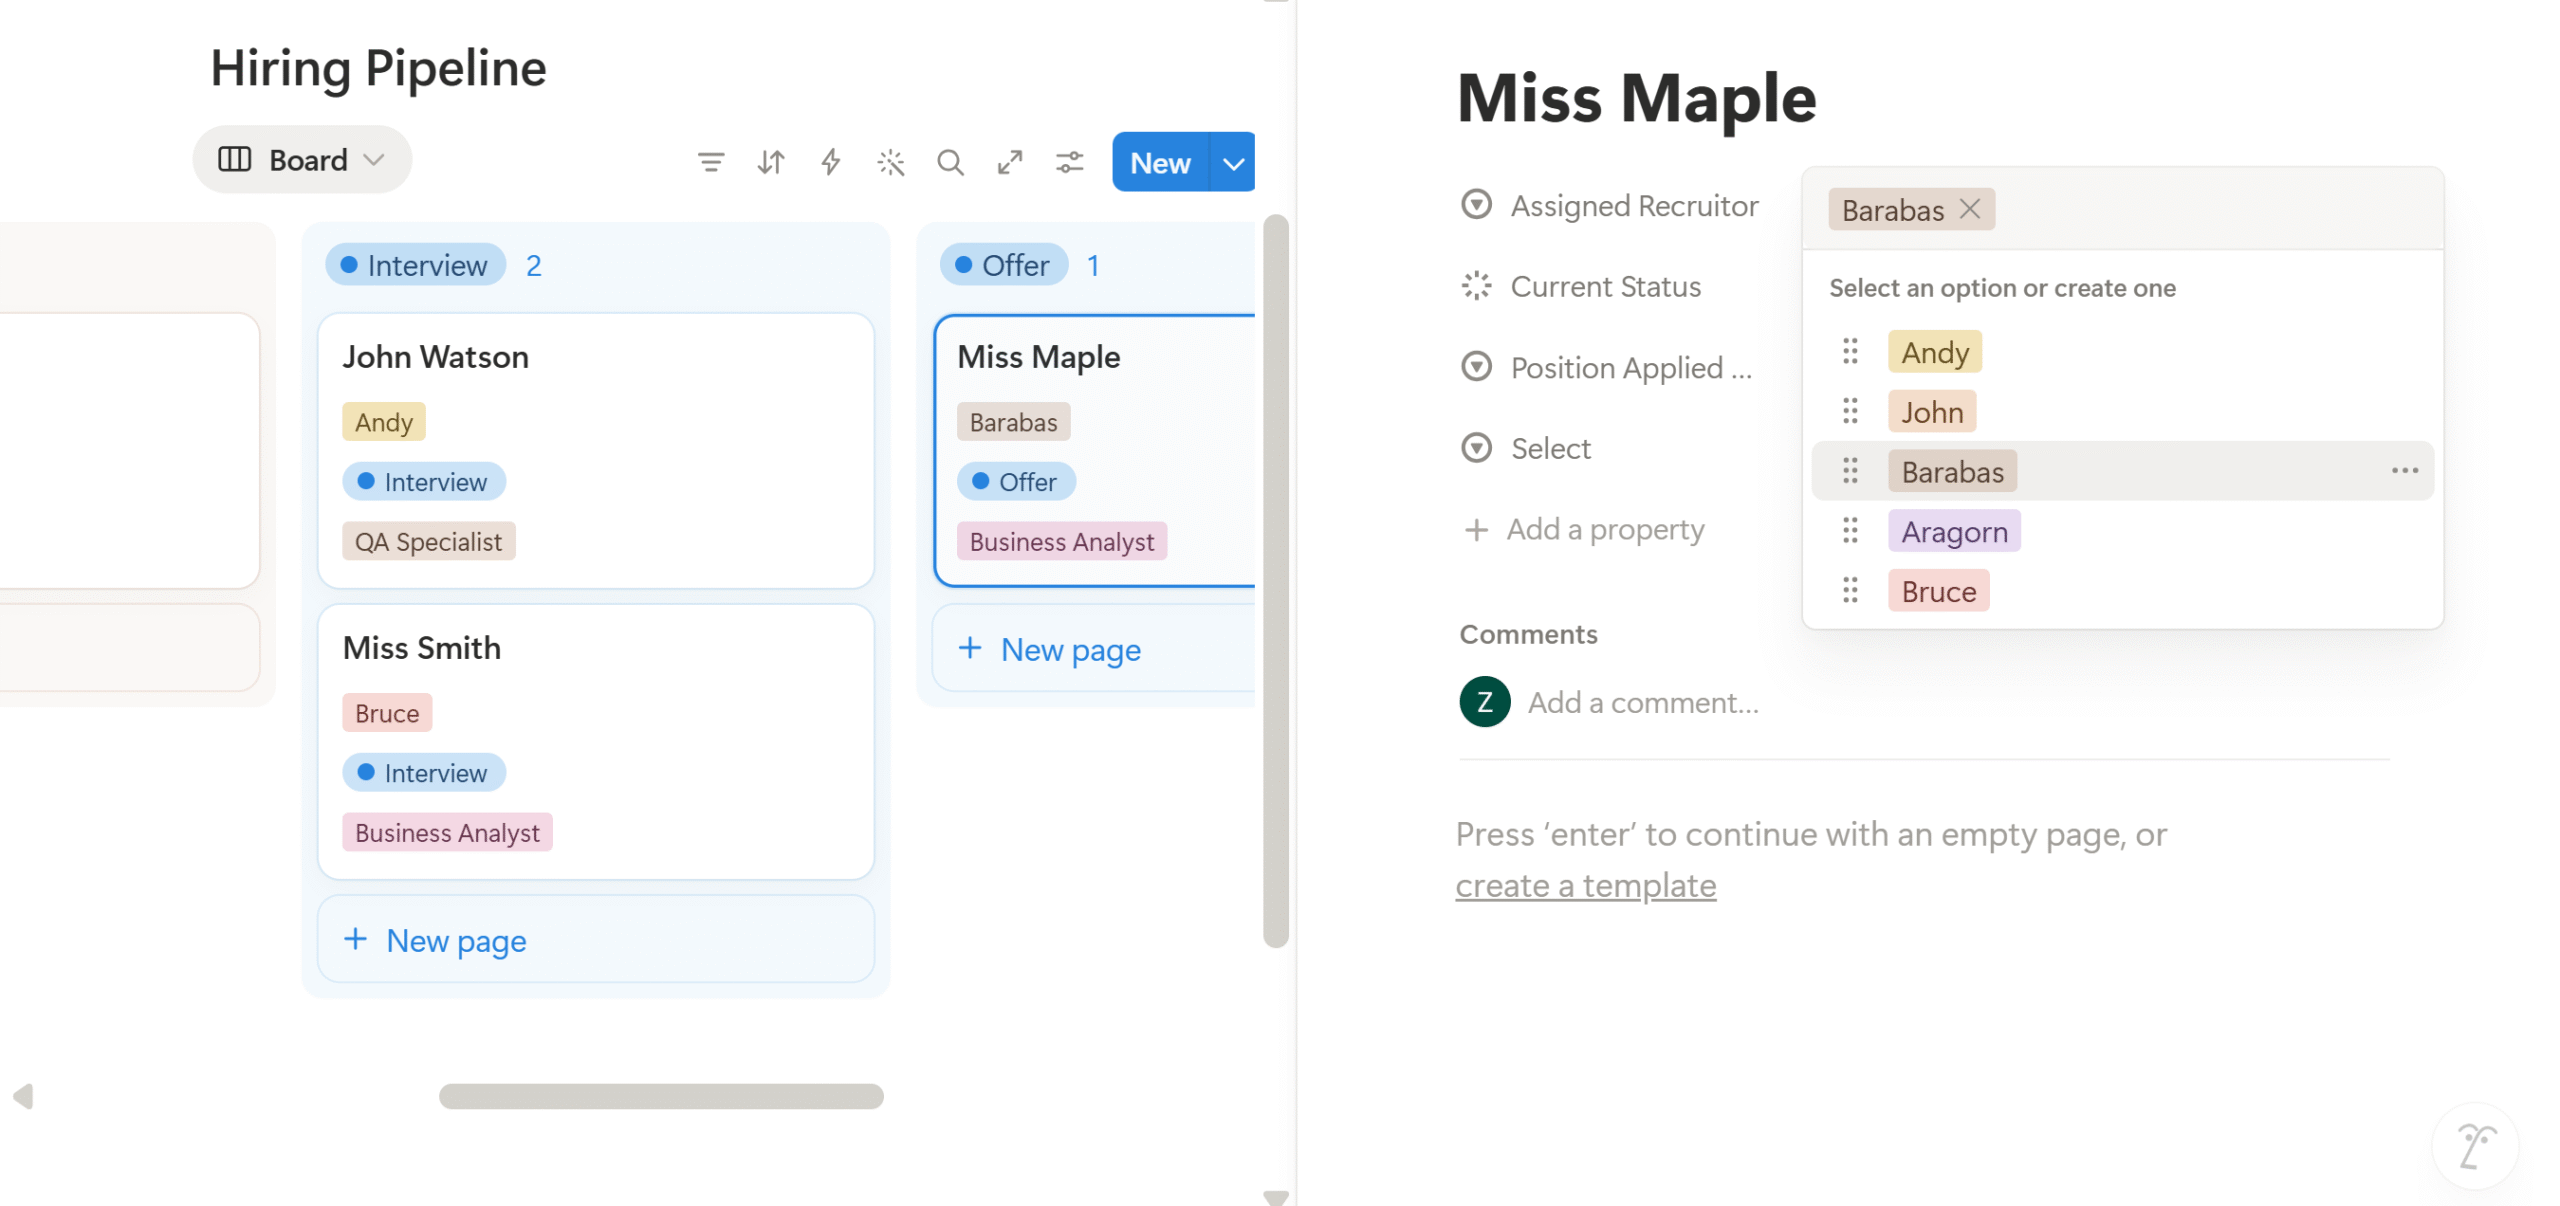
These cards can hold all the candidate information, such as their current status, position applied for, assigned recruiter, and supporting notes/documents.
If you want to add a tag, you can do it inside the card. There’s a field in the card called “property.” It’s where you create all the labels.
For example, if you want to assign a card to a team member, click the property, choose “select,” and build a new label, “Assigned Recruiter.” You can assign team members under this property now.
5. Run The Hiring Pipeline
At this point, you have already put everything together. All you need to do is stay consistent.
Anytime a new position opens, create your job ad, add the Google Forms link to your career page, and publish the ad.
When you receive applications, manually shortlist candidates, add them to the Notion database, and assign a recruiter.
Now it’s your recruiter’s job to update the status.
You can add deadlines to keep an eye on your hiring pipeline.
Just create a priority tag inside the card and add your deadline. The date will automatically turn red a day before the expiry, highlighting the pending tasks.
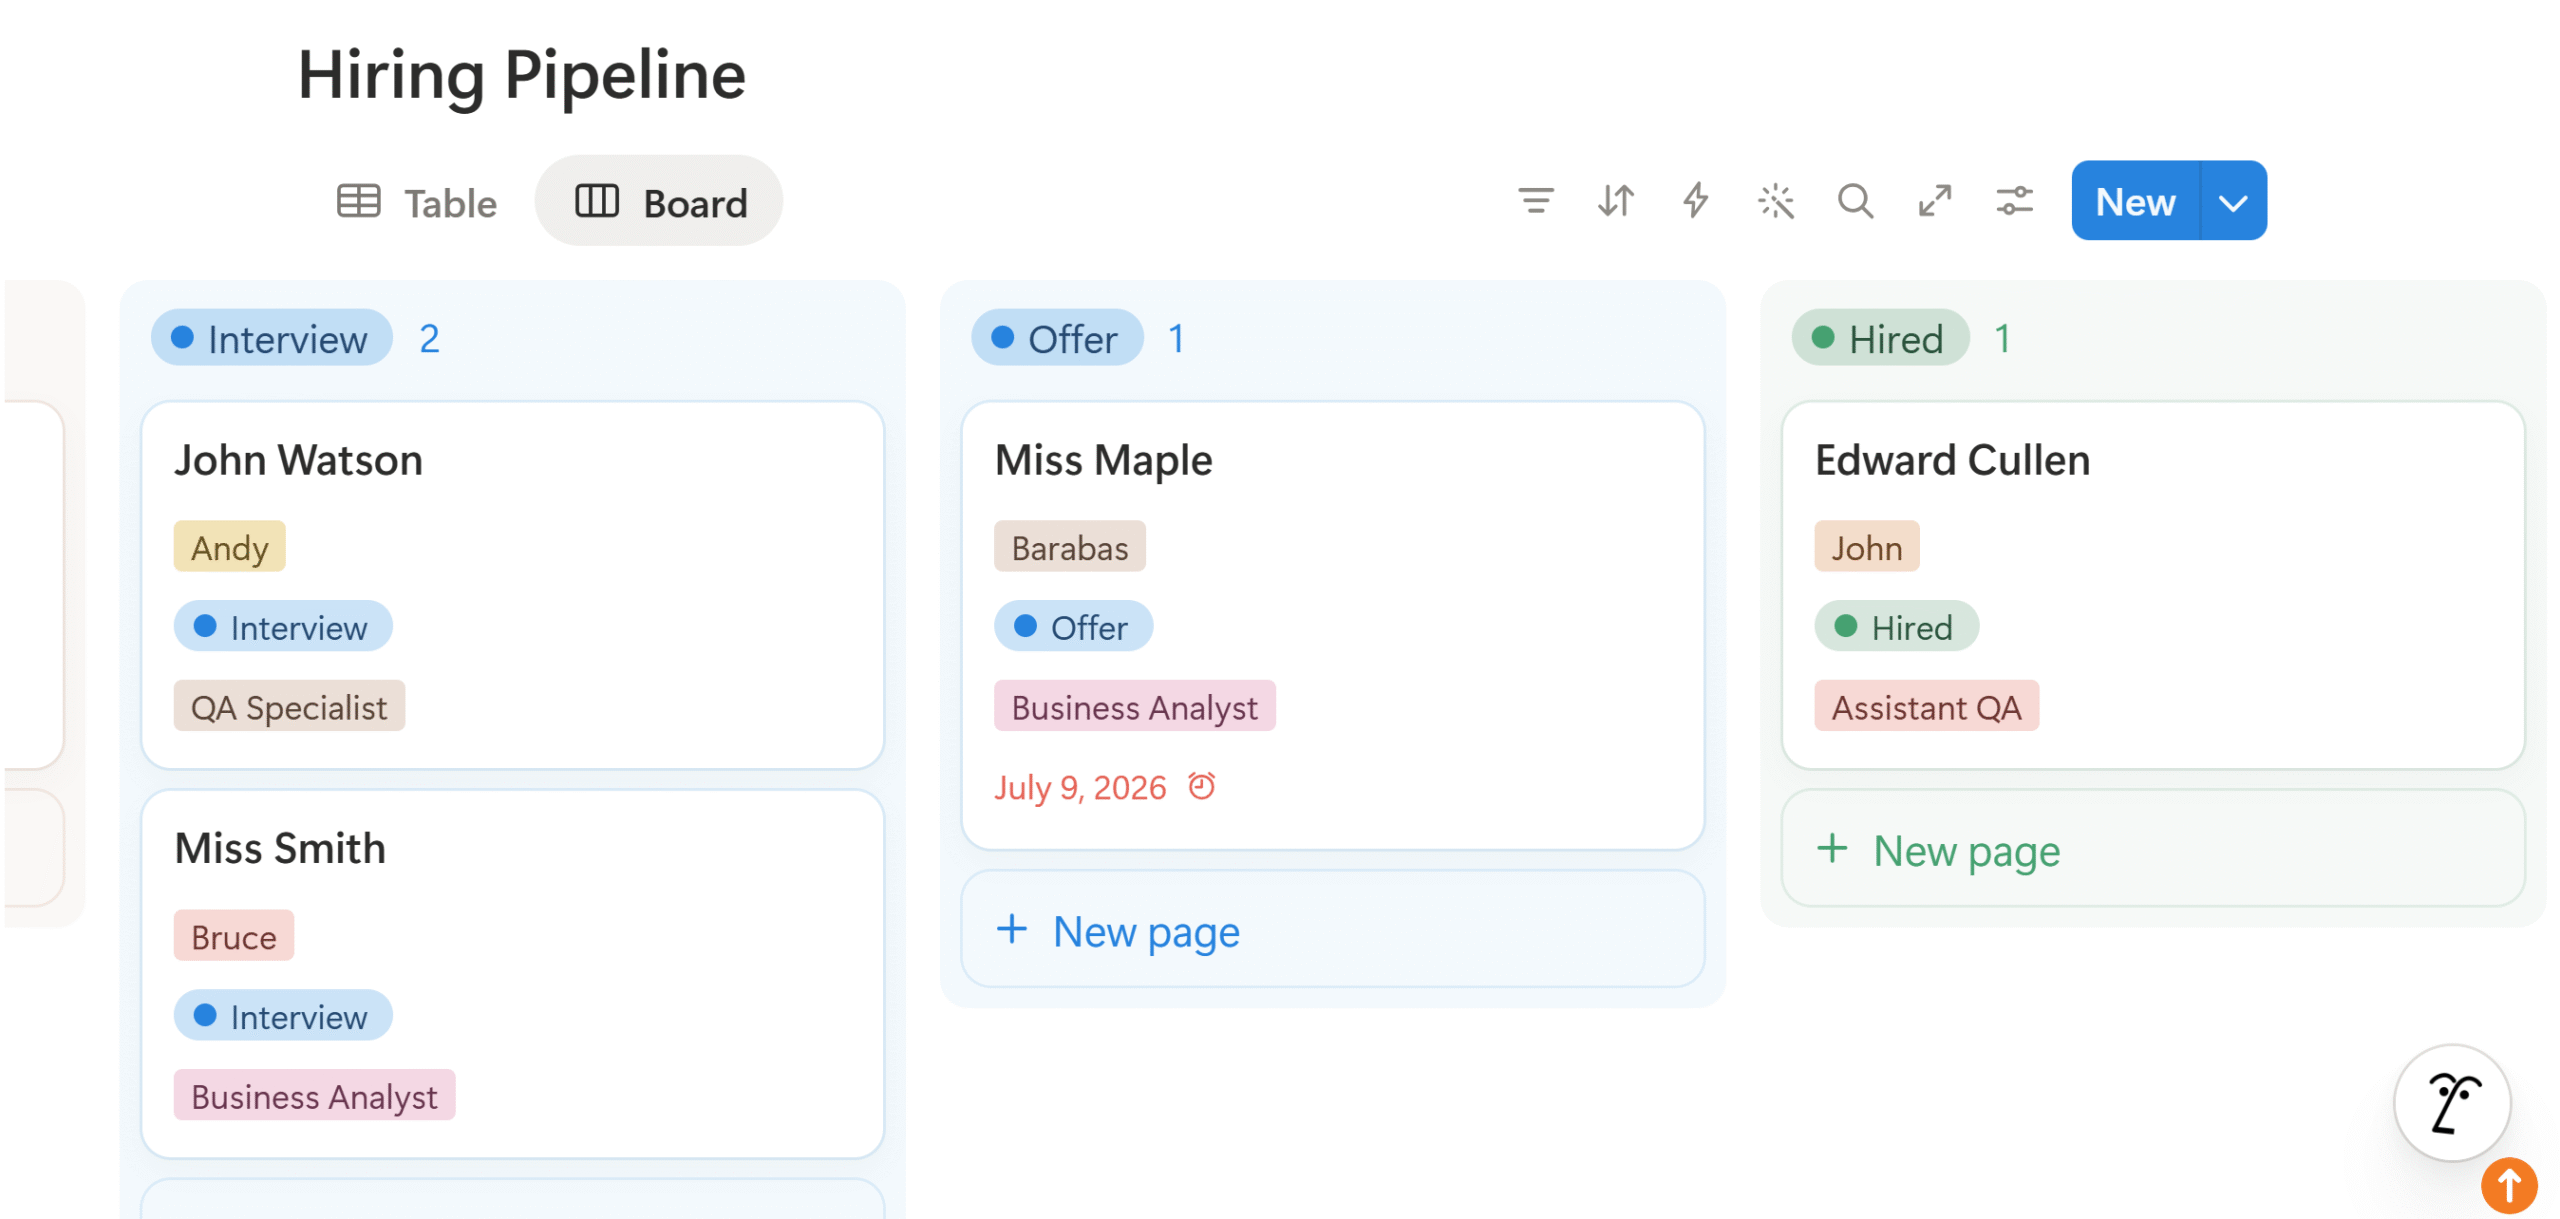
You can also leave instructions and feedback inside each card for the assigned recruiter. If they have any queries, they can tag you and post the message inside the card.
That’s pretty much how you run a hiring pipeline as a 5-person team.
Here’s the link to the hiring pipeline templates I created in Notion.
Study it and try to recreate another one in Notion.
Conclusion
A hiring pipeline isn’t difficult to manage if you have a well-structured system.
A simple Notion board can help you organize every candidate in one place, making the process more visible and easier to manage
Sure, you won’t get the same level of automation as an ATS, but that’s not our goal here.
At this stage, you need a hiring process that improves your workflow efficiency without adding unnecessary complications or extra cost.
You can always upgrade your system later as your business grows.
Start with a simple pipeline on Notion, put it to practice, and improvise as you hire.
Related reading: employee onboarding platforms and resume screening software.


 A better way to manage projects and clients for freelancers
 Get through busy days like a breeze with Reclaim.ai